Geogrid Fabric for Retaining Wall, Slope and Roadbase Support
Geogrid Universal
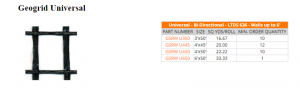
Bi-directional (biaxial) geogrid with lengths of 3, 4, or 6 feet that may be put perpendicular or parallel to the wall.
Geogrid 3 Series

It’s ideal for retaining walls up to 10 feet tall and may be used in both directions. This geogrid can run parallel to the retaining wall or perpendicular to it.
Uni-directional Geogrid 5-9 Series

To maintain its strength, this geogrid must be installed perpendicular to the retaining wall.
Table of Contents
How to Make a Proper Geogrid Fabric (Stabilizing Grid) Retaining Wall:
Retaining walls are essential for safeguarding landscapes from natural influences. To ensure long-term stability, the wall must be built appropriately and with the suitable materials. If the corners aren’t cut and a stabilising grid isn’t employed, the wall will lose its stability and fall, putting people in risk and causing damage to the landscape. Always examine their experience in this field of construction when choosing pros to complete the task.
Retaining walls collapse for a variety of causes. One of the most prevalent causes is a lack of drainage behind the wall. Moisture circulates, freezes, and thaws as a result of inadequate drainage, which can happen on a regular basis throughout the colder months. This happens more frequently in the spring and then again in the fall in several northern areas. With a clay back-fill, ice forms in the nights and then melts as it works its way deeper into the surrounding region and pushes outward.
There will be no reinforcement to bear the force if a retaining wall is constructed too high. Customers pay thousands of dollars to construct these retaining walls, then thousands more to demolish them and start again. Anyone can look up crumbling retaining walls on the internet and see how devastating the results may be.
How To Build A Good Retaining Wall:
A retaining wall is actually pretty simple to construct, and the materials required are inexpensive. Additional digging, backfilling, and compacting will be required in order to correctly construct the wall. On the plus side, it’s a bargain compared to the cost of having to start over.
Unfortunately, many individuals are unaware of stabilising grids and whether or not they require them in their building in order to save time and money. They will frequently engage contractors who have no understanding of how a retaining wall works or when a stabilising grid is required.
SRW’s stabilising grid is a woven fabric with exceptional strength. This cloth is fastened between the layers of the retaining wall and has a high tensile strength. This extends into the soil that the wall is retaining, securing the block or stone wall to the soil behind it.
When Is Grid Stabilization Necessary?
The kind of soil to be maintained, as well as the wall’s construction material, will determine if a stabilising grid is required. Clay soils, for example, expand when wet and absorb water, making them the most difficult to keep dry. Stabilizing grid is highly recommended when clay soil needs to be kept.
The material chosen to construct a retaining wall is quite important; the more substantial the material, the less stabilising grid will be required. If the exposed height of a six-inch or eight-inch wide split face limestone wall exceeds 24 inches, a stabilising grid should be considered.
For man-made walls with a height of 36″ to 48″, depending on the design and size, a stabilising grid is most desirable. If there is a slope at the base of the wall, a stabilising grid should be considered as well.
Stabilizing grid should be utilised on walls that are above 6 feet tall, made of 24” or wider limestone or equivalent stones, and highly solid material.
- Step one
In constructing the retaining wall is to dig the soil area for reinforcement. To maximise the embedment (or enclosed area) length for the stabilising grid, all existing soils should be removed. Each stabilising grid layer should be placed on top of a level soil condition behind the wall components.
- Step two is to create a plan.
The stabilising grid must be cut in parts from the roll to a certain length (the embedment depth). The stabilising grid should be rolled in the direction of the embankment, away from the wall. When purchasing a biaxial or unbiaxial stabilising grid, always verify the manufacturer’s specifications. The stabilising grid is usually rolled perpendicular to the wall’s face.
- Step three is the most important.
To guarantee a positive operational connection between the unit and the stabilising grid, attach the stabilising grid over the Keystone pins. Make sure the stabilising grid is within one inch of the wall’s face at all times.
- Fourth step:
To prevent any slack folds, secure the stabilising grid by drawing the pinned stabilising grid taut. Before and during back-filling and compaction, secure or stake the grid’s rear edge. After the back-fill is in place, you can remove the stakes if desired. You may then add more grid pieces, abutting each other, to give each layer a more continuous covering.
- Step No. 5:
Finally, apply back-fill in 8-inch lifts over the grid. Before driving any equipment over the grid, make sure there is at least 6 inches of reinforcing fill cover. Avoid driving or turning any vehicles straight over the grid, as this might result in significant damage.
 NHAI Infrastructure Development with Ocean Geocomposite in Patna, Bihar
 Uses of Geotextile bags
 Railway Projects at Ghana Case Study